🌟 New Year Sale: Up to 65% OFF Sitewide + Extra Savings!
🌟 New Year Sale: Up to 65% OFF Sitewide + Extra Savings!
Free Shipping $99+ • Delivery in 7–15 Days
Free Shipping $99+ • Delivery in 7–15 Days


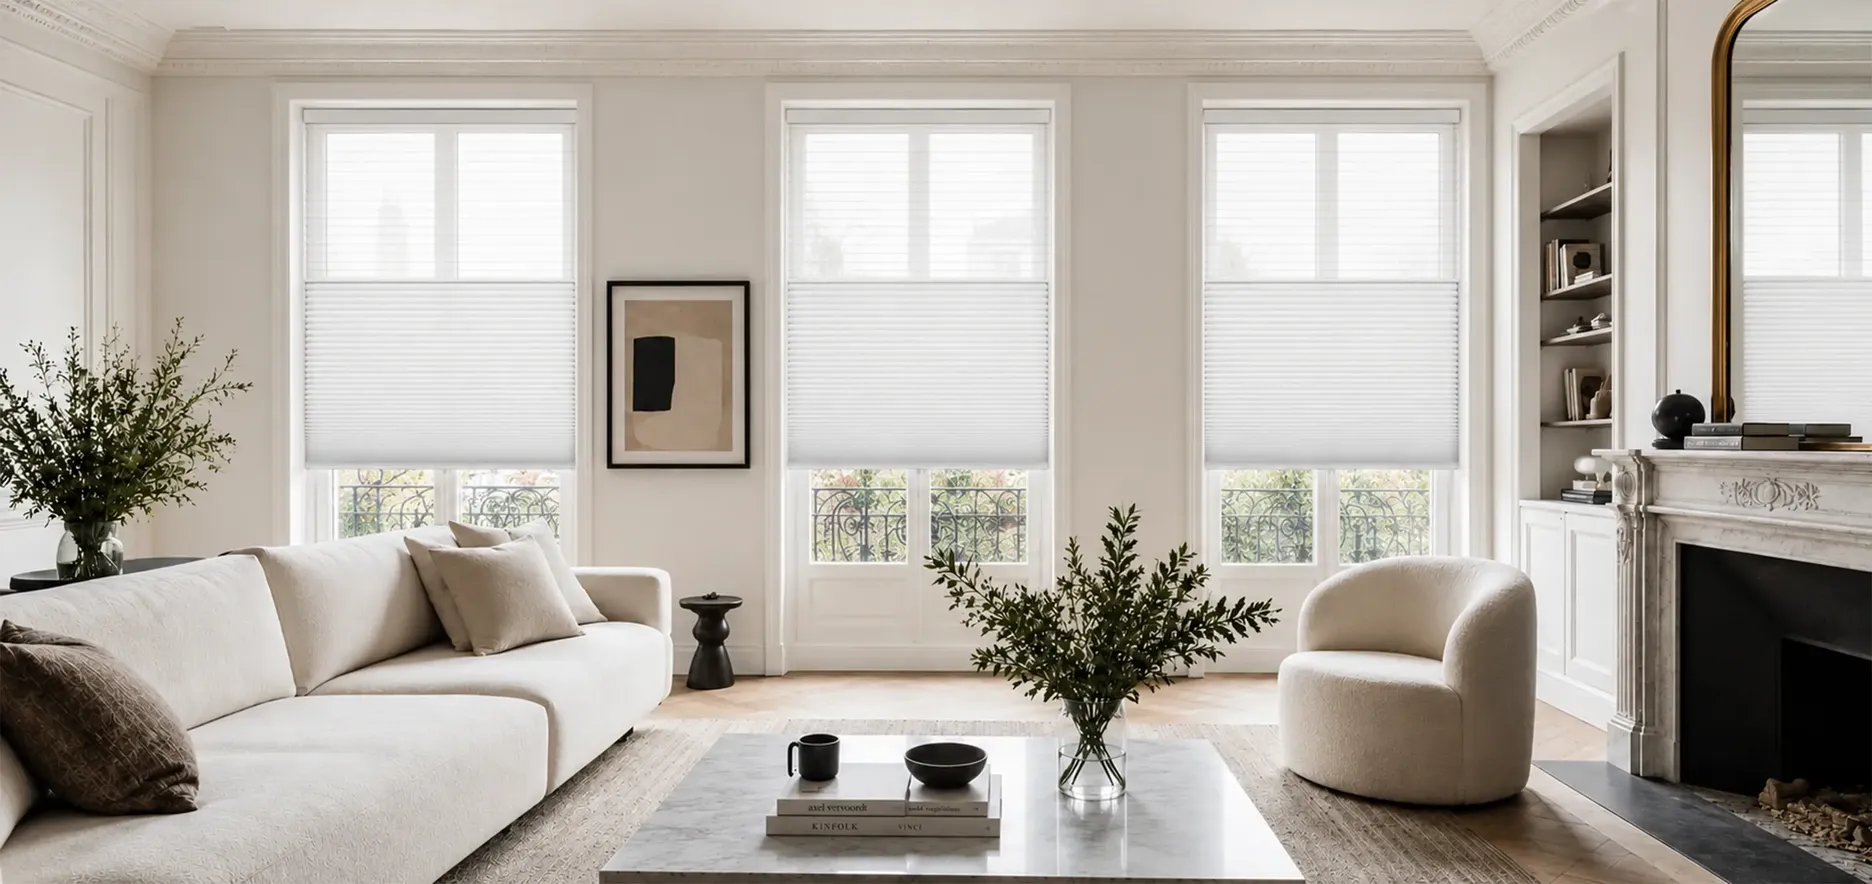
How To Measure
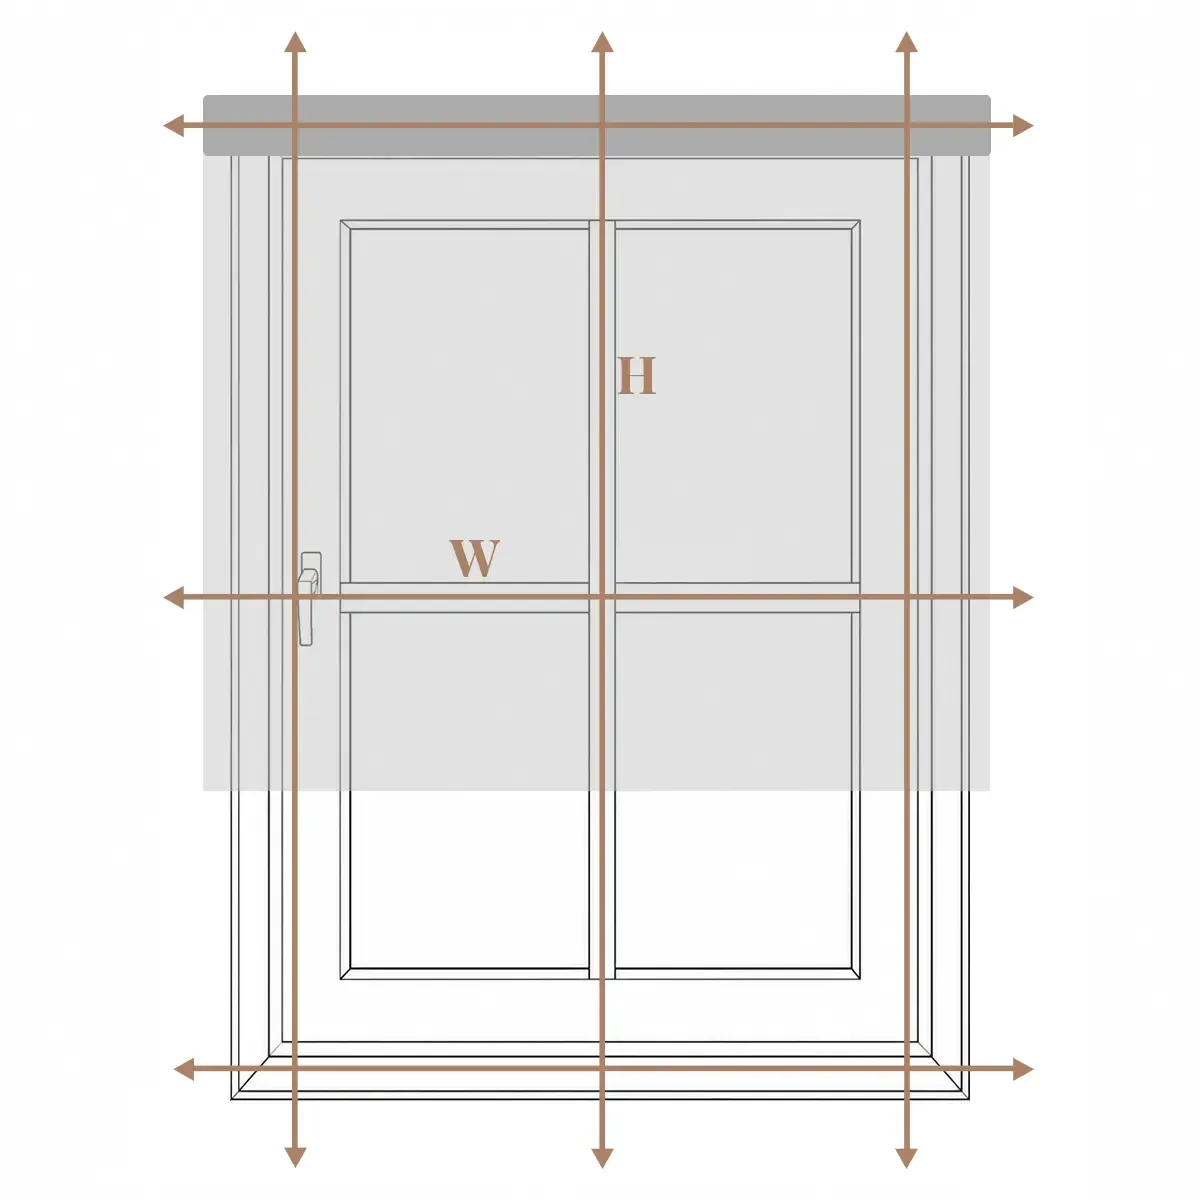
Learn how to measure for blinds and shades before ordering. Choose the mount, take three width and height readings, then check depth and obstructions.
Cellular Shades
Accurate measurements are the key to a perfect fit. Follow the instructions below and always record your measurements as Width x Height (W x H).
Before You Start
You will need:
• A steel tape measure
• A pencil
• Paper or a phone to record your measurements
Important reminders:
• Measure every window separately, even if the windows appear to be the same size.
• Measure to the nearest 1/8 inch.
• Check for handles, cranks, locks, or other obstructions that may interfere with the window treatment.
• If an inward-opening window handle blocks the product, an inside mount may not be suitable.
Step 1: Choose Your Mount Type
- Inside Mount
An inside mount is installed within the window recess for a clean, built-in appearance.
⚠:Inside-mount depth: For Cellular Shades, the window recess must have a minimum clear depth of 2 inches.
Choose an inside mount when:
• The window recess is deep enough.
• The mounting area is flat and unobstructed.
• You prefer a streamlined look within the window frame.
- Outside Mount
An outside mount is installed above and around the window opening. It is a good option when the window recess is too shallow or when you want better light coverage and privacy.
⚠:Outside-mount surface: Make sure there is at least 13/16 inch of flat mounting space available.
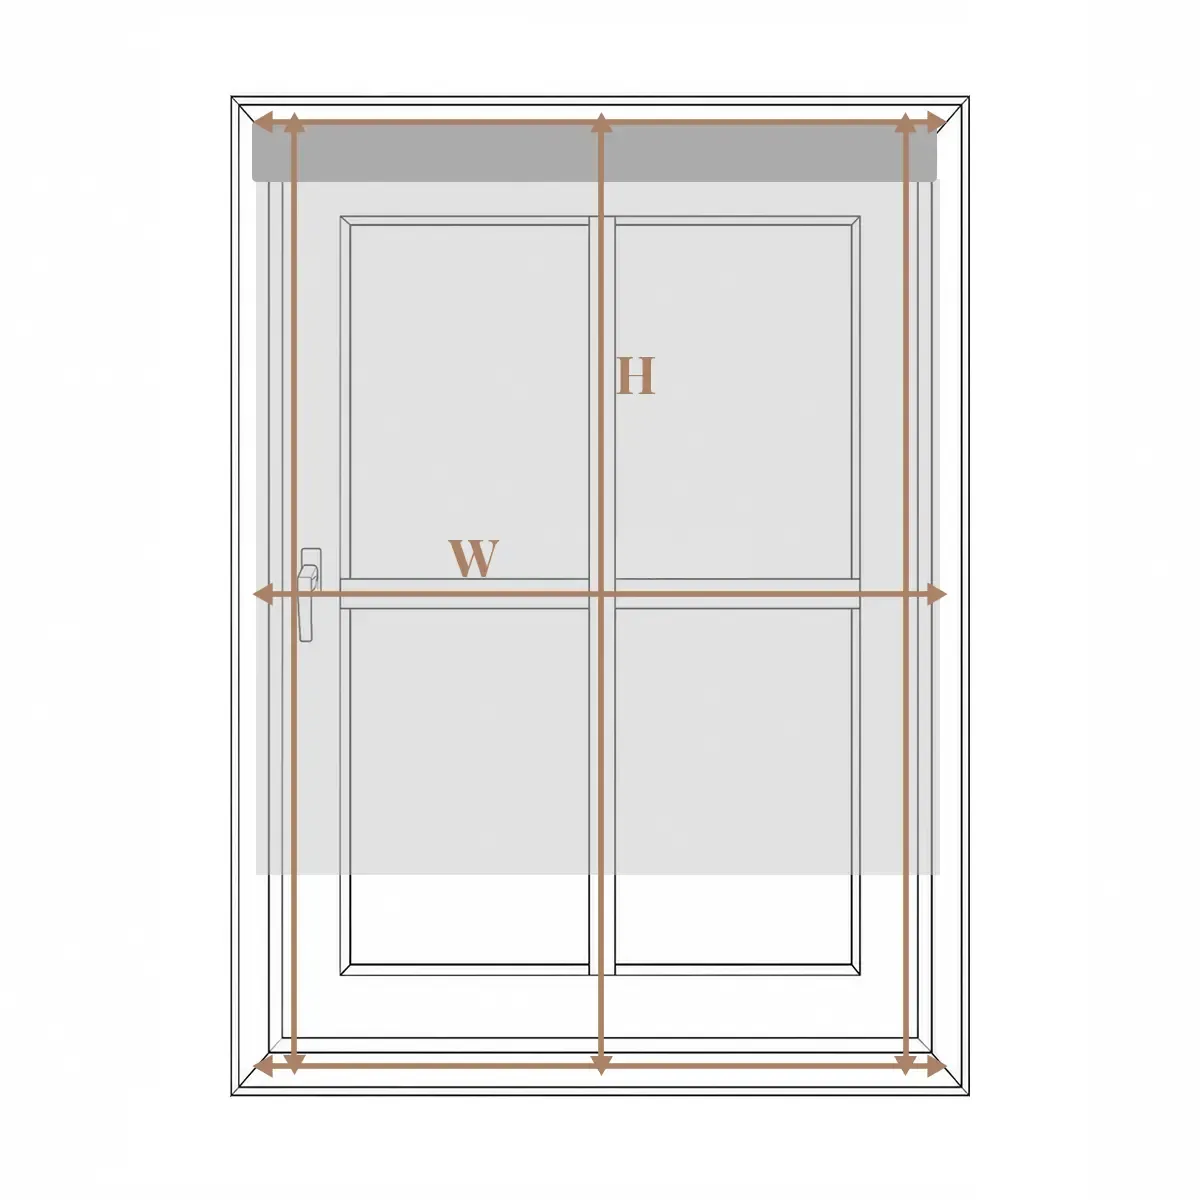
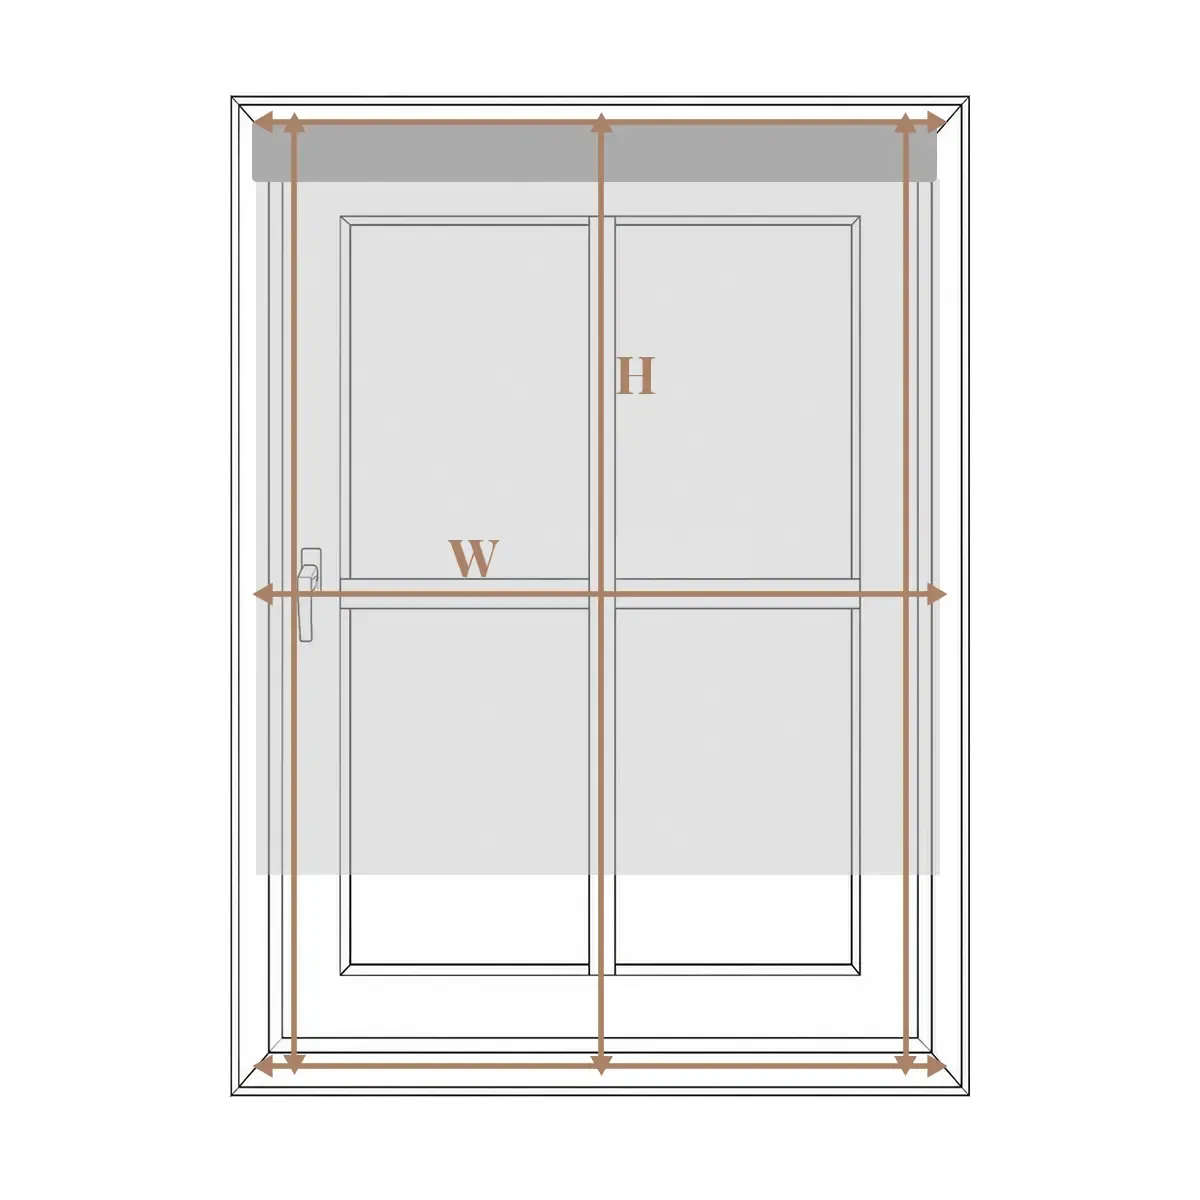
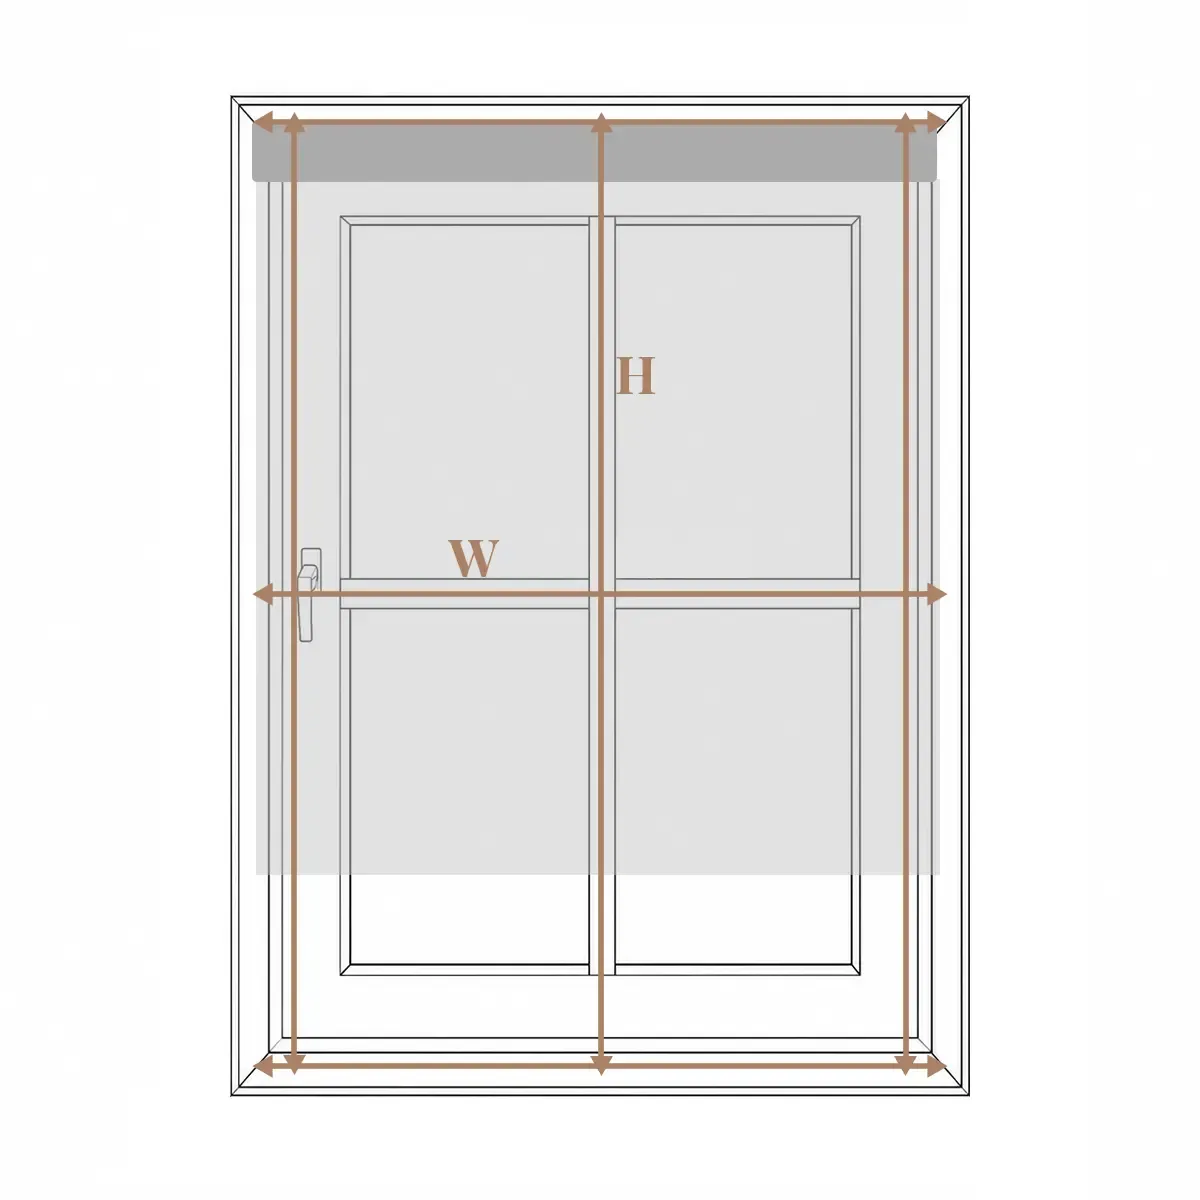
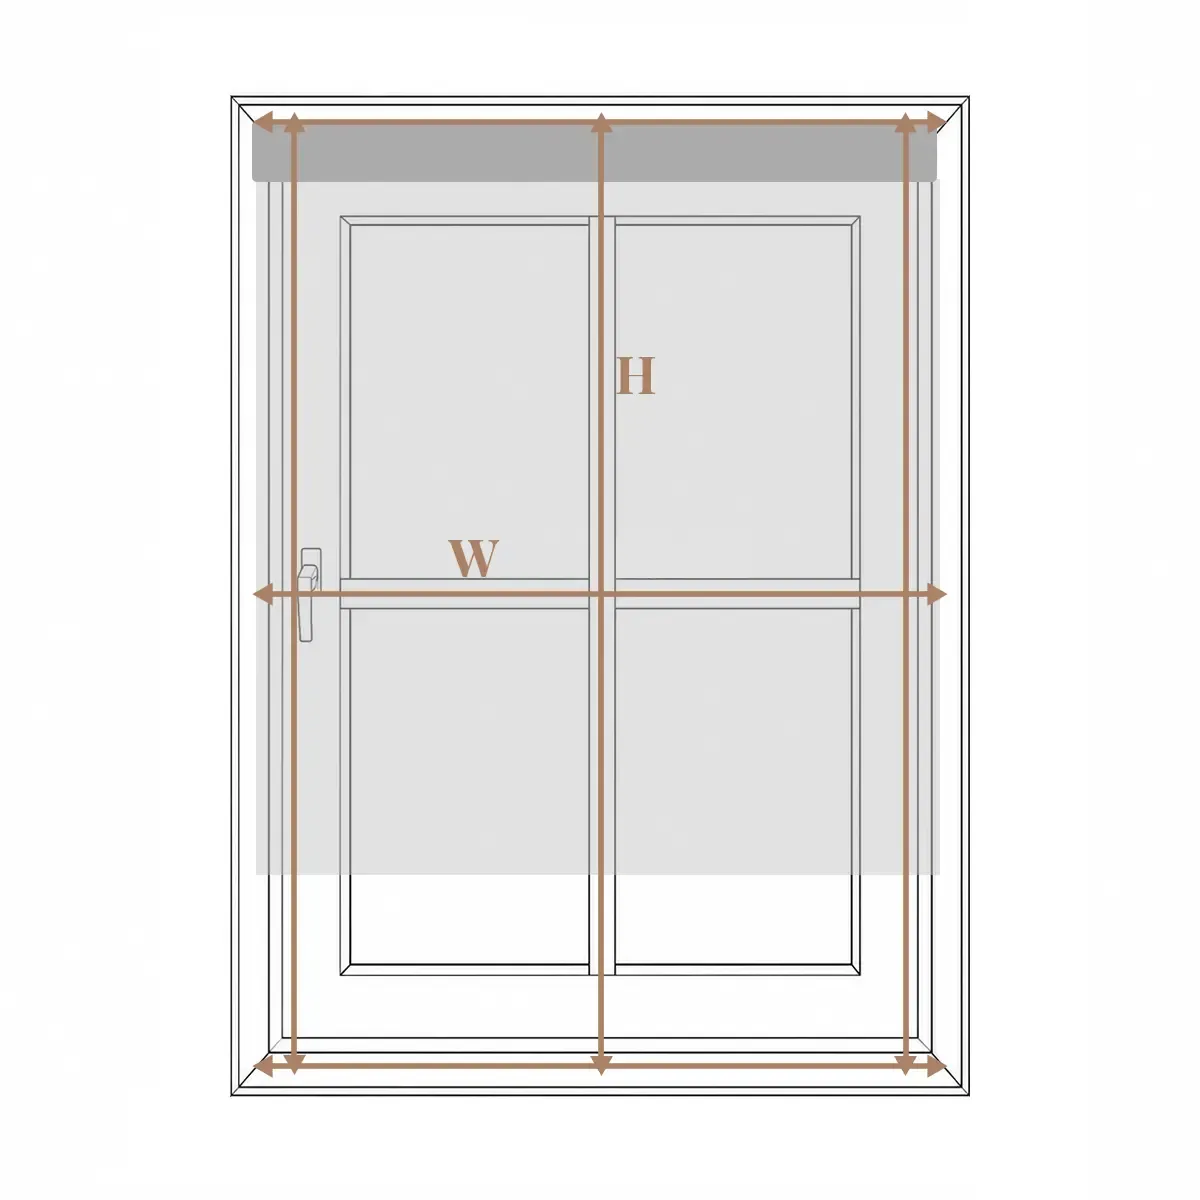
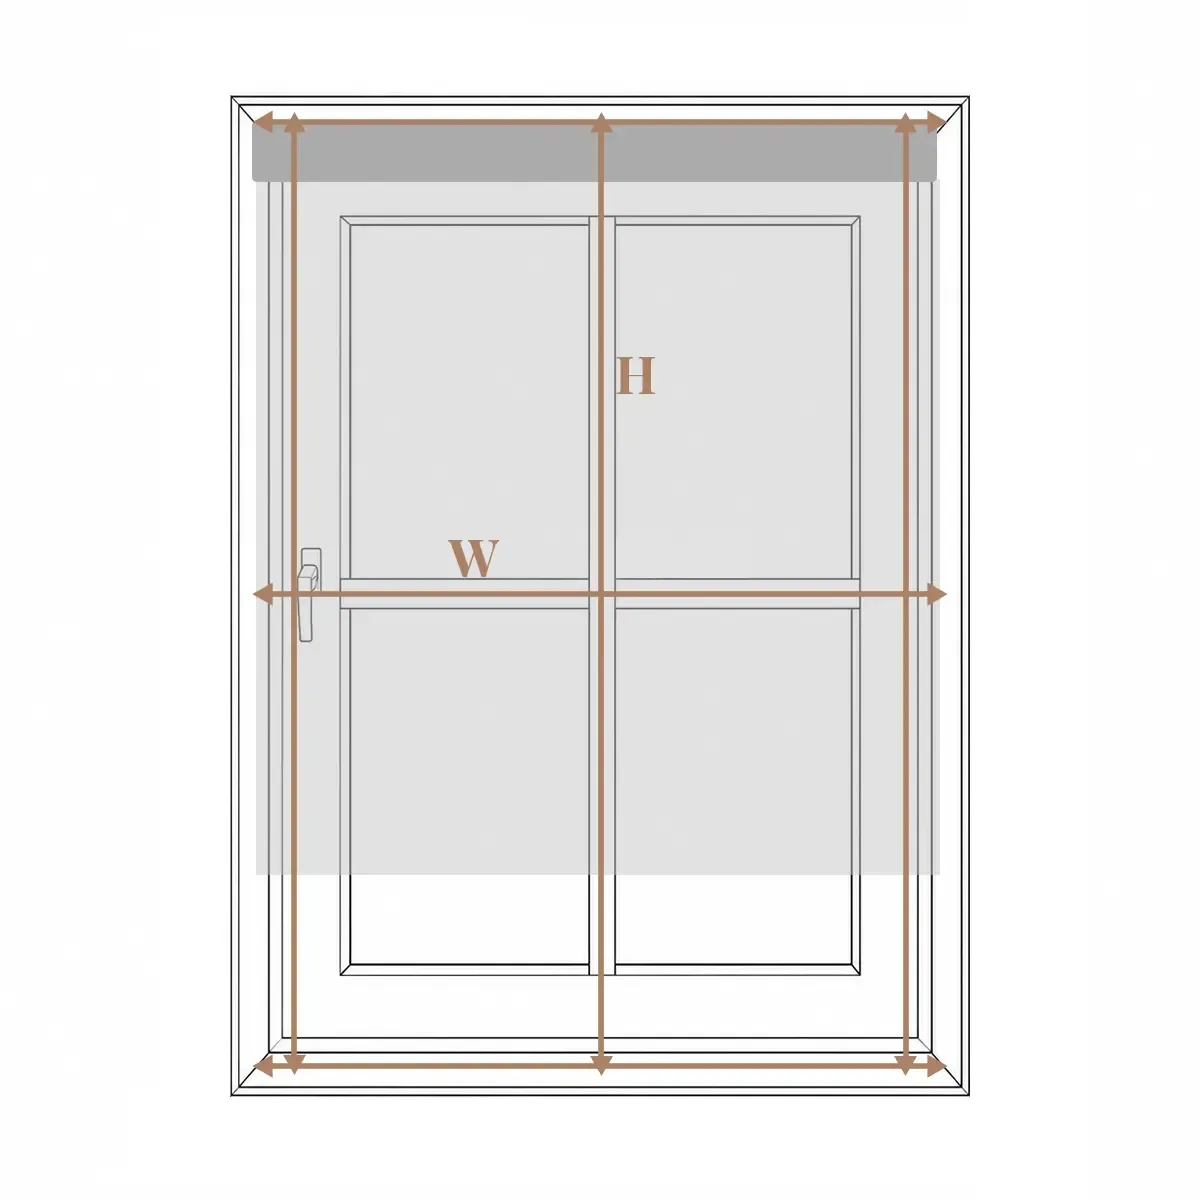
How to Measure for an Inside Mount
Provide the exact dimensions of the window opening. Do not make any deductions yourself.
1.Measure the Width
Measure the inside width of the window opening in three places: top, middle, and bottom.
Round each measurement down to the nearest 1/8 inch and record the smallest width.
2. Measure the Height
Measure the inside height of the window opening in three places: left, center, and right.
Round each measurement up to the nearest 1/8 inch and record the largest height.
3. Submit Your Measurements
Enter the exact window-opening dimensions as Width x Height.
Sovoen will make the required production deduction. For an inside mount, 3/16 inch will be deducted from the width, while the height will remain unchanged.
Important: Do not reduce the measurements yourself.
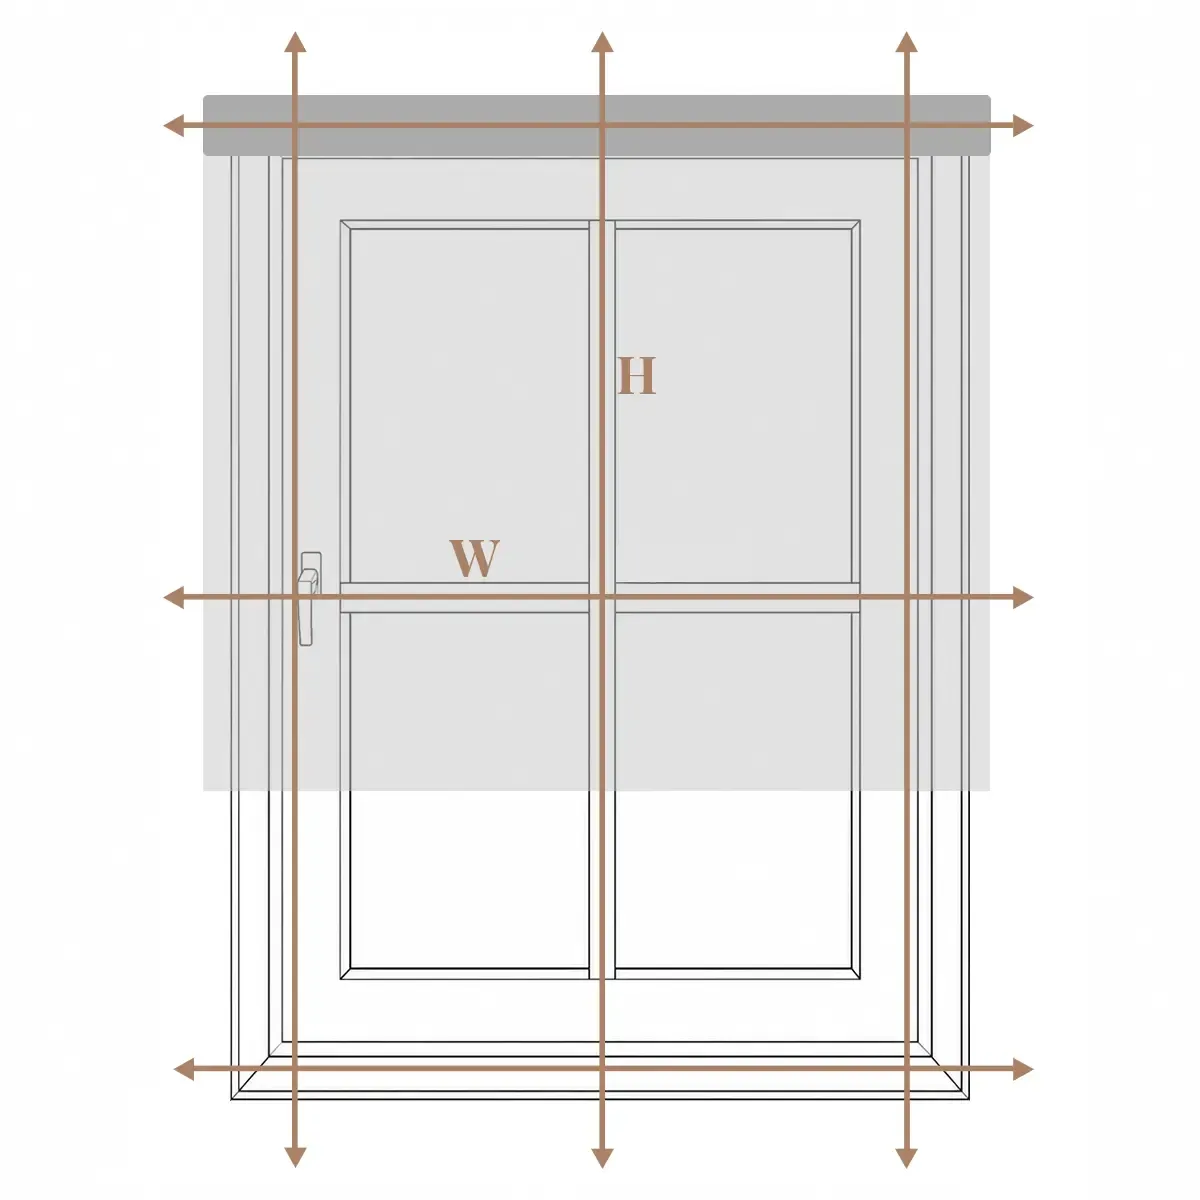
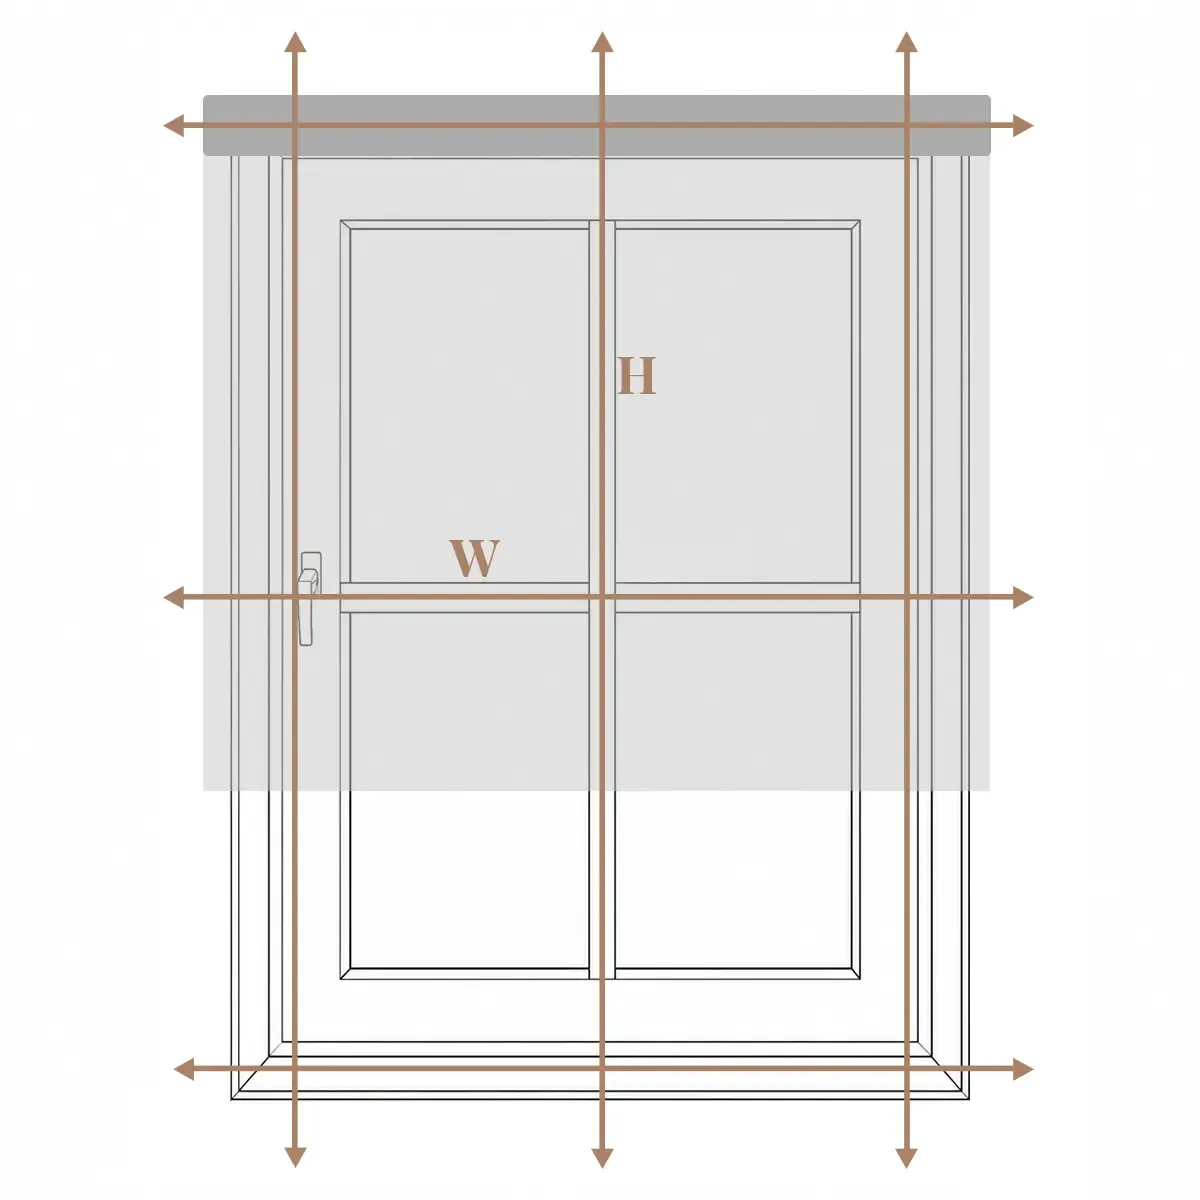
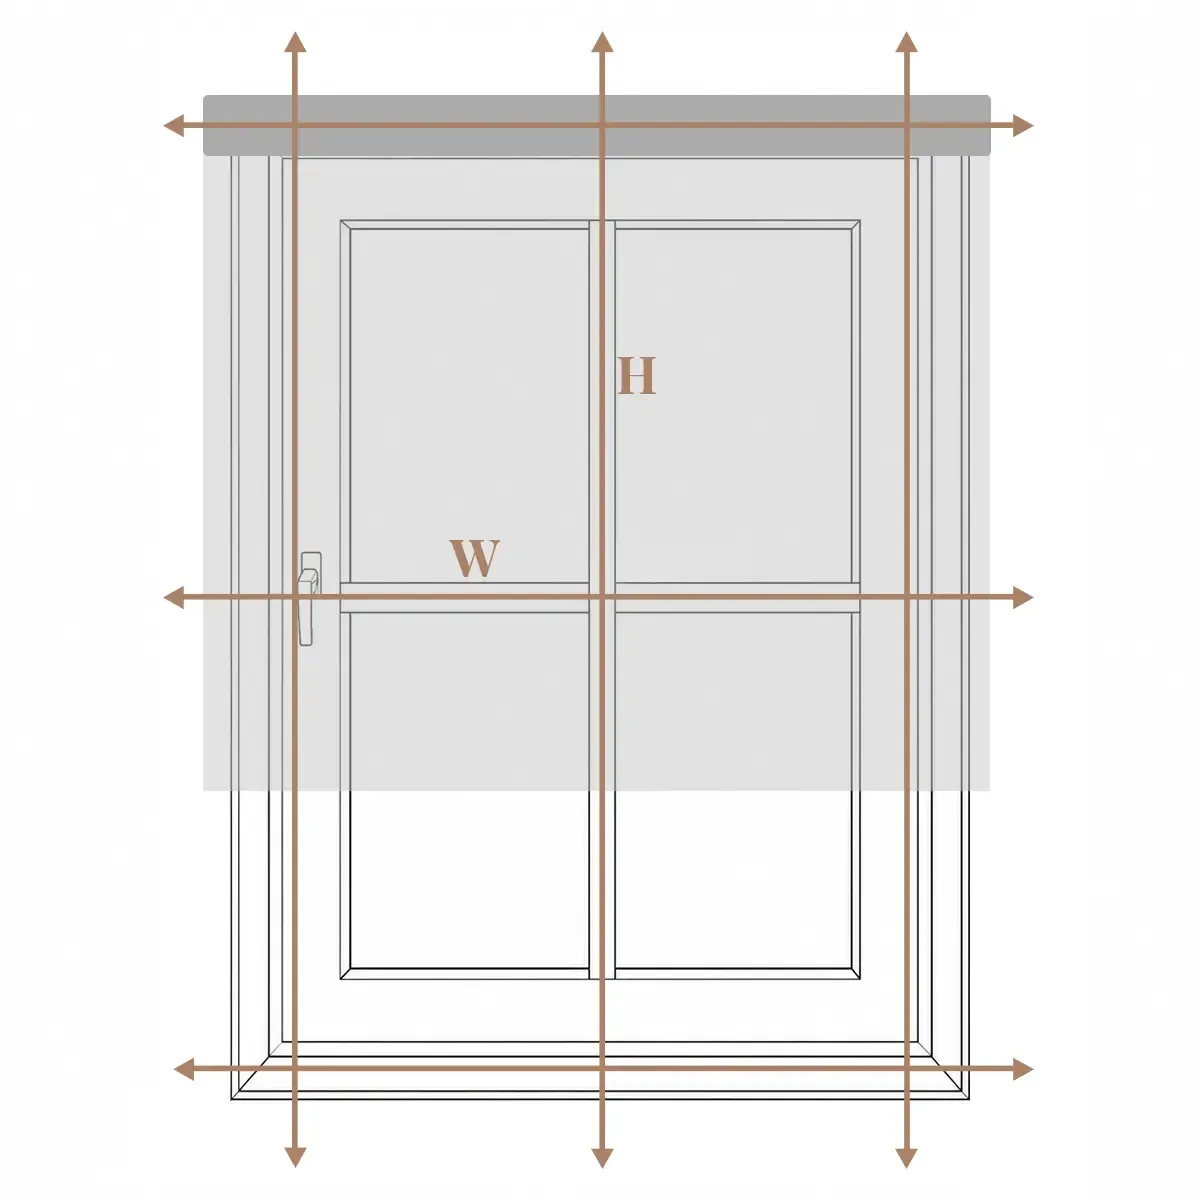
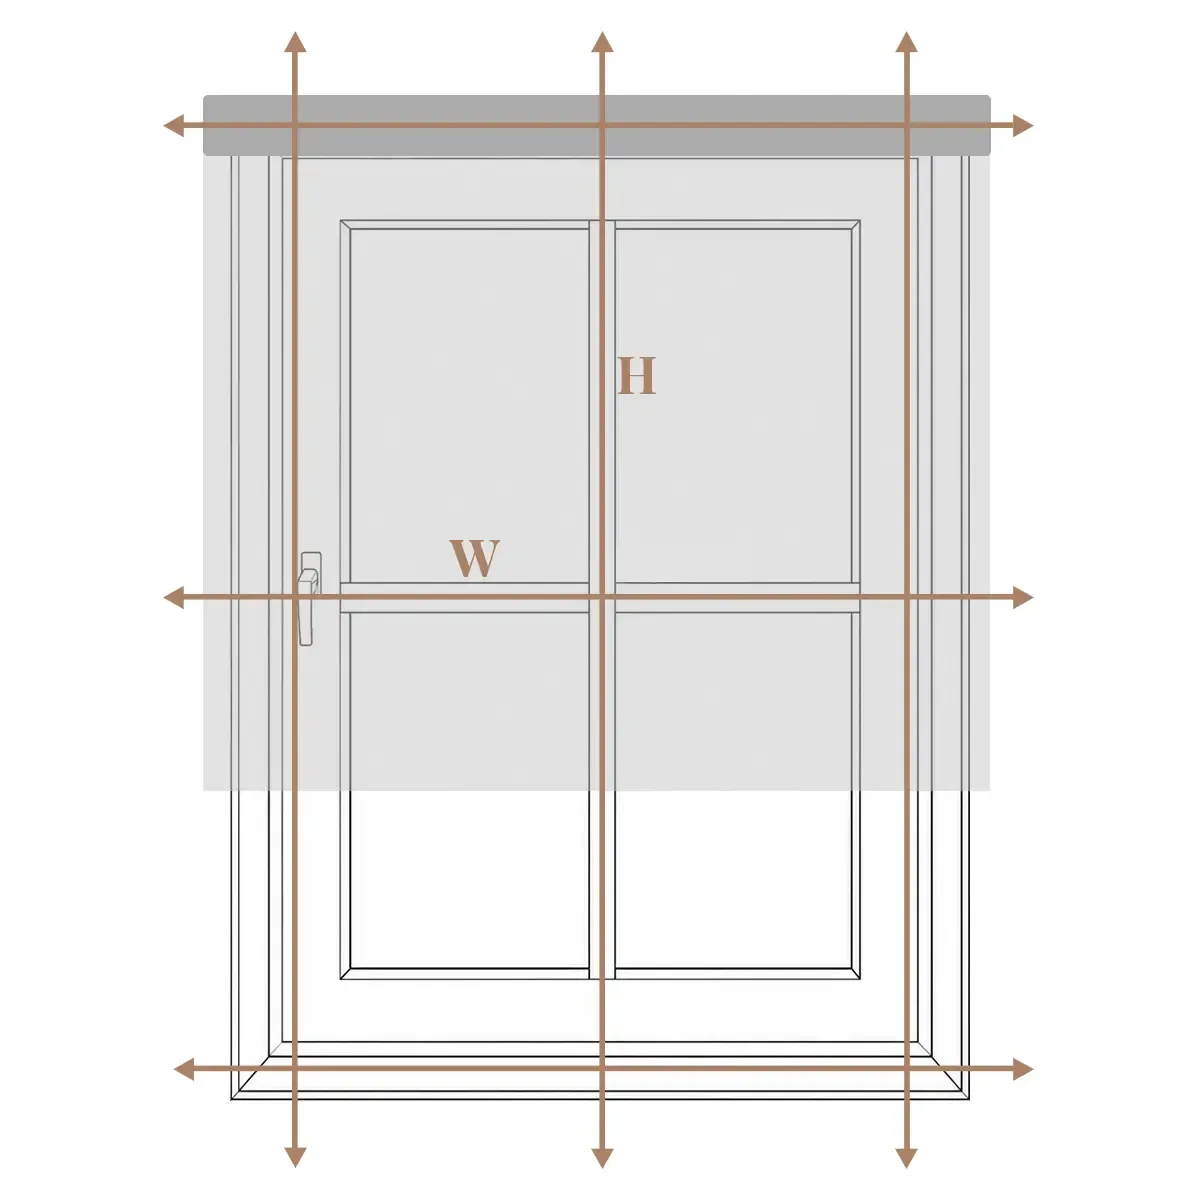
How to Measure for an Outside Mount
For an outside mount, the measurements you submit will be the exact finished size of your Cellular Shade. Sovoen will not make any deductions or additions.
1. Measure the Width
Measure the window-opening width at the top, middle, and bottom. Record the largest measurement.
Add extra width on both sides for better coverage:
• Standard Coverage: Add 2 inches to each side. The total finished width will be 4 inches greater than the window-opening width.
• Enhanced Blackout Coverage: Add 3 inches to each side. The total finished width will be 6 inches greater than the window-opening width.
Width example:
• If the window opening is 70 inches wide, standard coverage is 70 + 4 = 74 inches.
• If the window opening is 70 inches wide, enhanced coverage is 70 + 6 = 76 inches.
2. Measure the Height
Measure the window-opening height on the left, in the center, and on the right. Record the largest measurement.
Then add extra height based on your preferred coverage:
• Standard Coverage: Add 3 inches above the window opening and 2 inches below it. The total finished height will be 5 inches greater than the window-opening height.
• Enhanced Blackout Coverage: Add 3-4 inches above the window opening and 2-3 inches below it. The total finished height will be 5-7 inches greater than the window-opening height.
Height example:
• If the window opening is 70 inches high, standard coverage is 70 + 5 = 75 inches.
• If the window opening is 70 inches high, enhanced coverage is 70 + 7 = 77 inches.
If the window has a projecting sill, do not add extra length below the window opening. Add 3 inches above the opening for Standard Coverage, or 3-4 inches above it for Enhanced Blackout Coverage.
3. Submit the Finished Product Size
Enter the final dimensions as Width x Height.
Your Cellular Shade will be made to the exact dimensions you provide.
Final Measurement Checklist
• You selected the correct mount type.
• The window has enough clear depth for an inside mount.
• You measured each window separately.
• The measurements are recorded as Width x Height.
• You measured to the nearest 1/8 inch.
• You checked for handles, cranks, and other obstructions.
• For an outside mount, you included all desired overlap in the final dimensions.
Zebra Shades
Accurate measurements are the key to a perfect fit. Follow the instructions below and always record your measurements as Width x Height (W x H).
Before You Start
You will need:
• A steel tape measure
• A pencil
• Paper or a phone to record your measurements
Important reminders:
• Measure every window separately, even if the windows appear to be the same size.
• Measure to the nearest 1/8 inch.
• Check for handles, cranks, locks, or other obstructions that may interfere with the window treatment.
• If an inward-opening window handle blocks the product, an inside mount may not be suitable.
Step 1: Choose Your Mount Type
Inside Mount
An inside mount is installed within the window recess for a clean, built-in appearance.
⚠:Inside-mount depth: For Zebra Shades, the window recess must have a minimum clear depth of 4 inches.
Choose an inside mount when:
• The window recess is deep enough.
• The mounting area is flat and unobstructed.
• You prefer a streamlined look within the window frame.
Outside Mount
An outside mount is installed above and around the window opening. It is a good option when the window recess is too shallow or when you want better light coverage and privacy.
⚠:Outside-mount surface: Make sure there is at least 13/16 inch of flat mounting space available.
How to Measure for an Inside Mount
Provide the exact dimensions of the window opening. Do not make any deductions yourself.
1. Measure the Width
Measure the inside width of the window opening in three places: top, middle, and bottom.
Round each measurement down to the nearest 1/8 inch and record the smallest width.
2. Measure the Height
Measure the inside height of the window opening in three places: left, center, and right.
Round each measurement up to the nearest 1/8 inch and record the largest height.
3. Submit Your Measurements
Enter the exact window-opening dimensions as Width x Height.
SOVOEN will make the required production deduction. For an inside mount, 3/16 inch will be deducted from the width, while the height will remain unchanged.
Important: Do not reduce the measurements yourself.
How to Measure for an Outside Mount
For an outside mount, the measurements you submit will be the exact finished size of your Zebra Shade. Sovoen will not make any deductions or additions.
1. Measure the Width
Measure the window-opening width at the top, middle, and bottom. Record the largest measurement.
Add extra width on both sides for better coverage:
• Standard Coverage: Add 2 inches to each side. The total finished width will be 4 inches greater than the window-opening width.
• Enhanced Blackout Coverage: Add 3 inches to each side. The total finished width will be 6 inches greater than the window-opening width.
Width example:
• If the window opening is 70 inches wide, standard coverage is 70 + 4 = 74 inches.
• If the window opening is 70 inches wide, enhanced coverage is 70 + 6 = 76 inches.
2. Measure the Height
Measure the window-opening height on the left, in the center, and on the right. Record the largest measurement.
Then add extra height based on your preferred coverage:
• Standard Coverage: Add 3 inches above the window opening and 2 inches below it. The total finished height will be 5 inches greater than the window-opening height.
• Enhanced Blackout Coverage: Add 3-4 inches above the window opening and 2-3 inches below it. The total finished height will be 5-7 inches greater than the window-opening height.
Height example:
• If the window opening is 70 inches high, standard coverage is 70 + 5 = 75 inches.
• If the window opening is 70 inches high, enhanced coverage is 70 + 7 = 77 inches.
If the window has a projecting sill, do not add extra length below the window opening. Add 3 inches above the opening for Standard Coverage, or 3-4 inches above it for Enhanced Blackout Coverage.
3. Submit the Finished Product Size
Enter the final dimensions as Width x Height.
Your Zebra Shade will be made to the exact dimensions you provide.
Final Measurement Checklist
• You selected the correct mount type.
• The window has enough clear depth for an inside mount.
• You measured each window separately.
• The measurements are recorded as Width x Height.
• You measured to the nearest 1/8 inch.
• You checked for handles, cranks, and other obstructions.
• For an outside mount, you included all desired overlap in the final dimensions.
Wood Blinds
Accurate measurements are the key to a perfect fit. Follow the instructions below and always record your measurements as Width x Height (W x H).
Before You Start
You will need:
• A steel tape measure
• A pencil
• Paper or a phone to record your measurements
Important reminders:
• Measure every window separately, even if the windows appear to be the same size.
• Measure to the nearest 1/8 inch.
• Check for handles, cranks, locks, or other obstructions that may interfere with the window treatment.
• If an inward-opening window handle blocks the product, an inside mount may not be suitable.
Step 1: Choose Your Mount Type
Inside Mount
An inside mount is installed within the window recess for a clean, built-in appearance.
⚠:Inside-mount depth: For Wood Blinds, the window recess must have a minimum clear depth of 3 inches.
Choose an inside mount when:
• The window recess is deep enough.
• The mounting area is flat and unobstructed.
• You prefer a streamlined look within the window frame.
Outside Mount
An outside mount is installed above and around the window opening. It is a good option when the window recess is too shallow or when you want better light coverage and privacy.
⚠:Outside-mount surface: Make sure there is at least 13/16 inch of flat mounting space available.
How to Measure for an Inside Mount
Provide the exact dimensions of the window opening. Do not make any deductions yourself.
1. Measure the Width
Measure the inside width of the window opening in three places: top, middle, and bottom.
Round each measurement down to the nearest 1/8 inch and record the smallest width.
2. Measure the Height
Measure the inside height of the window opening in three places: left, center, and right.
Round each measurement up to the nearest 1/8 inch and record the largest height.
3. Submit Your Measurements
Enter the exact window-opening dimensions as Width x Height.
Sovoen will make the required production deduction. For an inside mount, 3/16 inch will be deducted from the width, while the height will remain unchanged.
Important: Do not reduce the measurements yourself.
How to Measure for an Outside Mount
For an outside mount, the measurements you submit will be the exact finished size of your Wood Blind. Sovoen will not make any deductions or additions.
1. Measure the Width
Measure the window-opening width at the top, middle, and bottom. Record the largest measurement.
Add extra width on both sides for better coverage:
• Standard Coverage: Add 2 inches to each side. The total finished width will be 4 inches greater than the window-opening width.
• Enhanced Blackout Coverage: Add 3 inches to each side. The total finished width will be 6 inches greater than the window-opening width.
Width example:
• If the window opening is 70 inches wide, standard coverage is 70 + 4 = 74 inches.
• If the window opening is 70 inches wide, enhanced coverage is 70 + 6 = 76 inches.
2. Measure the Height
Measure the window-opening height on the left, in the center, and on the right. Record the largest measurement.
Then add extra height based on your preferred coverage:
• Standard Coverage: Add 3 inches above the window opening and 2 inches below it. The total finished height will be 5 inches greater than the window-opening height.
• Enhanced Blackout Coverage: Add 3-4 inches above the window opening and 2-3 inches below it. The total finished height will be 5-7 inches greater than the window-opening height.
Height example:
• If the window opening is 70 inches high, standard coverage is 70 + 5 = 75 inches.
• If the window opening is 70 inches high, enhanced coverage is 70 + 7 = 77 inches.
If the window has a projecting sill, do not add extra length below the window opening. Add 3 inches above the opening for Standard Coverage, or 3-4 inches above it for Enhanced Blackout Coverage.
3. Submit the Finished Product Size
Enter the final dimensions as Width x Height.
Your Wood Blind will be made to the exact dimensions you provide.
Final Measurement Checklist
• You selected the correct mount type.
• The window has enough clear depth for an inside mount.
• You measured each window separately.
• The measurements are recorded as Width x Height.
• You measured to the nearest 1/8 inch.
• You checked for handles, cranks, and other obstructions.
• For an outside mount, you included all desired overlap in the final dimensions.
Leather Blinds
Accurate measurements are the key to a perfect fit. Follow the instructions below and always record your measurements as Width x Height (W x H).
Before You Start
You will need:
• A steel tape measure
• A pencil
• Paper or a phone to record your measurements
Important reminders:
• Measure every window separately, even if the windows appear to be the same size.
• Measure to the nearest 1/8 inch.
• Check for handles, cranks, locks, or other obstructions that may interfere with the window treatment.
• If an inward-opening window handle blocks the product, an inside mount may not be suitable.
Step 1: Choose Your Mount Type
Inside Mount
An inside mount is installed within the window recess for a clean, built-in appearance.
⚠:Inside-mount depth: For Leather Blinds, the window recess must have a minimum clear depth of 3 inches.
Choose an inside mount when:
• The window recess is deep enough.
• The mounting area is flat and unobstructed.
• You prefer a streamlined look within the window frame.
Outside Mount
An outside mount is installed above and around the window opening. It is a good option when the window recess is too shallow or when you want better light coverage and privacy.
⚠:Outside-mount surface: Make sure there is at least 13/16 inch of flat mounting space available.
How to Measure for an Inside Mount
Provide the exact dimensions of the window opening. Do not make any deductions yourself.
1. Measure the Width
Measure the inside width of the window opening in three places: top, middle, and bottom.
Round each measurement down to the nearest 1/8 inch and record the smallest width.
2. Measure the Height
Measure the inside height of the window opening in three places: left, center, and right.
Round each measurement up to the nearest 1/8 inch and record the largest height.
3. Submit Your Measurements
Enter the exact window-opening dimensions as Width x Height.
Sovoen will make the required production deduction. For an inside mount, 3/16 inch will be deducted from the width, while the height will remain unchanged.
Important: Do not reduce the measurements yourself.
How to Measure for an Outside Mount
For an outside mount, the measurements you submit will be the exact finished size of your Leather Blind. Sovoen will not make any deductions or additions.
1. Measure the Width
Measure the window-opening width at the top, middle, and bottom. Record the largest measurement.
Add extra width on both sides for better coverage:
• Standard Coverage: Add 2 inches to each side. The total finished width will be 4 inches greater than the window-opening width.
• Enhanced Blackout Coverage: Add 3 inches to each side. The total finished width will be 6 inches greater than the window-opening width.
Width example:
• If the window opening is 70 inches wide, standard coverage is 70 + 4 = 74 inches.
• If the window opening is 70 inches wide, enhanced coverage is 70 + 6 = 76 inches.
2. Measure the Height
Measure the window-opening height on the left, in the center, and on the right. Record the largest measurement.
Then add extra height based on your preferred coverage:
• Standard Coverage: Add 3 inches above the window opening and 2 inches below it. The total finished height will be 5 inches greater than the window-opening height.
• Enhanced Blackout Coverage: Add 3-4 inches above the window opening and 2-3 inches below it. The total finished height will be 5-7 inches greater than the window-opening height.
Height example:
• If the window opening is 70 inches high, standard coverage is 70 + 5 = 75 inches.
• If the window opening is 70 inches high, enhanced coverage is 70 + 7 = 77 inches.
If the window has a projecting sill, do not add extra length below the window opening. Add 3 inches above the opening for Standard Coverage, or 3-4 inches above it for Enhanced Blackout Coverage.
3. Submit the Finished Product Size
Enter the final dimensions as Width x Height.
Your Leather Blind will be made to the exact dimensions you provide.
Final Measurement Checklist
• You selected the correct mount type.
• The window has enough clear depth for an inside mount.
• You measured each window separately.
• The measurements are recorded as Width x Height.
• You measured to the nearest 1/8 inch.
• You checked for handles, cranks, and other obstructions.
• For an outside mount, you included all desired overlap in the final dimensions.
Fabric Blinds
Accurate measurements are the key to a perfect fit. Follow the instructions below and always record your measurements as Width x Height (W x H).
Before You Start
You will need:
• A steel tape measure
• A pencil
• Paper or a phone to record your measurements
Important reminders:
• Measure every window separately, even if the windows appear to be the same size.
• Measure to the nearest 1/8 inch.
• Check for handles, cranks, locks, or other obstructions that may interfere with the window treatment.
• If an inward-opening window handle blocks the product, an inside mount may not be suitable.
Step 1: Choose Your Mount Type
Inside Mount
An inside mount is installed within the window recess for a clean, built-in appearance.
⚠: Inside-mount depth: For Fabric Blinds, the window recess must have a minimum clear depth of 3 inches.
Choose an inside mount when:
• The window recess is deep enough.
• The mounting area is flat and unobstructed.
• You prefer a streamlined look within the window frame.
Outside Mount
An outside mount is installed above and around the window opening. It is a good option when the window recess is too shallow or when you want better light coverage and privacy.
⚠: Outside-mount surface: Make sure there is at least 13/16 inch of flat mounting space available.
How to Measure for an Inside Mount
Provide the exact dimensions of the window opening. Do not make any deductions yourself.
1. Measure the Width
Measure the inside width of the window opening in three places: top, middle, and bottom.
Round each measurement down to the nearest 1/8 inch and record the smallest width.
2. Measure the Height
Measure the inside height of the window opening in three places: left, center, and right.
Round each measurement up to the nearest 1/8 inch and record the largest height.
3. Submit Your Measurements
Enter the exact window-opening dimensions as Width x Height.
Sovoen will make the required production deduction. For an inside mount, 3/16 inch will be deducted from the width, while the height will remain unchanged.
Important: Do not reduce the measurements yourself.
How to Measure for an Outside Mount
For an outside mount, the measurements you submit will be the exact finished size of your Fabric Blind. Sovoen will not make any deductions or additions.
1. Measure the Width
Measure the window-opening width at the top, middle, and bottom. Record the largest measurement.
Add extra width on both sides for better coverage:
• Standard Coverage: Add 2 inches to each side. The total finished width will be 4 inches greater than the window-opening width.
• Enhanced Blackout Coverage: Add 3 inches to each side. The total finished width will be 6 inches greater than the window-opening width.
Width example:
• If the window opening is 70 inches wide, standard coverage is 70 + 4 = 74 inches.
• If the window opening is 70 inches wide, enhanced coverage is 70 + 6 = 76 inches.
2. Measure the Height
Measure the window-opening height on the left, in the center, and on the right. Record the largest measurement.
Then add extra height based on your preferred coverage:
• Standard Coverage: Add 3 inches above the window opening and 2 inches below it. The total finished height will be 5 inches greater than the window-opening height.
• Enhanced Blackout Coverage: Add 3-4 inches above the window opening and 2-3 inches below it. The total finished height will be 5-7 inches greater than the window-opening height.
Height example:
• If the window opening is 70 inches high, standard coverage is 70 + 5 = 75 inches.
• If the window opening is 70 inches high, enhanced coverage is 70 + 7 = 77 inches.
If the window has a projecting sill, do not add extra length below the window opening. Add 3 inches above the opening for Standard Coverage, or 3-4 inches above it for Enhanced Blackout Coverage.
3. Submit the Finished Product Size
Enter the final dimensions as Width x Height.
Your Fabric Blind will be made to the exact dimensions you provide.
Final Measurement Checklist
• You selected the correct mount type.
• The window has enough clear depth for an inside mount.
• You measured each window separately.
• The measurements are recorded as Width x Height.
• You measured to the nearest 1/8 inch.
• You checked for handles, cranks, and other obstructions.
• For an outside mount, you included all desired overlap in the final dimensions.
Roller Shades
Accurate measurements are the key to a perfect fit. Follow the instructions below and always record your measurements as Width x Height (W x H).
Before You Start
You will need:
• A steel tape measure
• A pencil
• Paper or a phone to record your measurements
Important reminders:
• Measure every window separately, even if the windows appear to be the same size.
• Measure to the nearest 1/8 inch.
• Check for handles, cranks, locks, or other obstructions that may interfere with the window treatment.
• If an inward-opening window handle blocks the product, an inside mount may not be suitable.
Step 1: Choose Your Mount Type
Inside Mount
An inside mount is installed within the window recess for a clean, built-in appearance.
⚠:Inside-mount depth: For Roller Shades, the window recess must have a minimum clear depth of 4 inches.
Choose an inside mount when:
• The window recess is deep enough.
• The mounting area is flat and unobstructed.
• You prefer a streamlined look within the window frame.
Outside Mount
An outside mount is installed above and around the window opening. It is a good option when the window recess is too shallow or when you want better light coverage and privacy.
⚠:Outside-mount surface: Make sure there is at least 13/16 inch of flat mounting space available.
How to Measure for an Inside Mount
Provide the exact dimensions of the window opening. Do not make any deductions yourself.
1. Measure the Width
Measure the inside width of the window opening in three places: top, middle, and bottom.
Round each measurement down to the nearest 1/8 inch and record the smallest width.
2. Measure the Height
Measure the inside height of the window opening in three places: left, center, and right.
Round each measurement up to the nearest 1/8 inch and record the largest height.
3. Submit Your Measurements
Enter the exact window-opening dimensions as Width x Height.
Sovoen will make the required production deduction. For an inside mount, 3/16 inch will be deducted from the width, while the height will remain unchanged.
Important: Do not reduce the measurements yourself.
How to Measure for an Outside Mount
For an outside mount, the measurements you submit will be the exact finished size of your Roller Shade. Sovoen will not make any deductions or additions.
1. Measure the Width
Measure the window-opening width at the top, middle, and bottom. Record the largest measurement.
Add extra width on both sides for better coverage:
• Standard Coverage: Add 2 inches to each side. The total finished width will be 4 inches greater than the window-opening width.
• Enhanced Blackout Coverage: Add 3 inches to each side. The total finished width will be 6 inches greater than the window-opening width.
Width example:
• If the window opening is 70 inches wide, standard coverage is 70 + 4 = 74 inches.
• If the window opening is 70 inches wide, enhanced coverage is 70 + 6 = 76 inches.
2. Measure the Height
Measure the window-opening height on the left, in the center, and on the right. Record the largest measurement.
Then add extra height based on your preferred coverage:
• Standard Coverage: Add 3 inches above the window opening and 2 inches below it. The total finished height will be 5 inches greater than the window-opening height.
• Enhanced Blackout Coverage: Add 3-4 inches above the window opening and 2-3 inches below it. The total finished height will be 5-7 inches greater than the window-opening height.
Height example:
• If the window opening is 70 inches high, standard coverage is 70 + 5 = 75 inches.
• If the window opening is 70 inches high, enhanced coverage is 70 + 7 = 77 inches.
If the window has a projecting sill, do not add extra length below the window opening. Add 3 inches above the opening for Standard Coverage, or 3-4 inches above it for Enhanced Blackout Coverage.
3. Submit the Finished Product Size
Enter the final dimensions as Width x Height.
Your Roller Shade will be made to the exact dimensions you provide.
Final Measurement Checklist
• You selected the correct mount type.
• The window has enough clear depth for an inside mount.
• You measured each window separately.
• The measurements are recorded as Width x Height.
• You measured to the nearest 1/8 inch.
• You checked for handles, cranks, and other obstructions.
• For an outside mount, you included all desired overlap in the final dimensions.
Sheer Shades
Accurate measurements are the key to a perfect fit. Follow the instructions below and always record your measurements as Width x Height (W x H).
Before You Start
You will need:
• A steel tape measure
• A pencil
• Paper or a phone to record your measurements
Important reminders:
• Measure every window separately, even if the windows appear to be the same size.
• Measure to the nearest 1/8 inch.
• Check for handles, cranks, locks, or other obstructions that may interfere with the window treatment.
• If an inward-opening window handle blocks the product, an inside mount may not be suitable.
Step 1: Choose Your Mount Type
Inside Mount
An inside mount is installed within the window recess for a clean, built-in appearance.
⚠:Inside-mount depth: For Sheer Shades, the window recess must have a minimum clear depth of 4 inches.
Choose an inside mount when:
• The window recess is deep enough.
• The mounting area is flat and unobstructed.
• You prefer a streamlined look within the window frame.
Outside Mount
An outside mount is installed above and around the window opening. It is a good option when the window recess is too shallow or when you want better light coverage and privacy.
⚠:Outside-mount surface: Make sure there is at least 13/16 inch of flat mounting space available.
How to Measure for an Inside Mount
Provide the exact dimensions of the window opening. Do not make any deductions yourself.
1. Measure the Width
Measure the inside width of the window opening in three places: top, middle, and bottom.
Round each measurement down to the nearest 1/8 inch and record the smallest width.
2. Measure the Height
Measure the inside height of the window opening in three places: left, center, and right.
Round each measurement up to the nearest 1/8 inch and record the largest height.
3. Submit Your Measurements
Enter the exact window-opening dimensions as Width x Height.
Sovoen will make the required production deduction. For an inside mount, 3/16 inch will be deducted from the width, while the height will remain unchanged.
Important: Do not reduce the measurements yourself.
How to Measure for an Outside Mount
For an outside mount, the measurements you submit will be the exact finished size of your Sheer Shade. Sovoen will not make any deductions or additions.
1. Measure the Width
Measure the window-opening width at the top, middle, and bottom. Record the largest measurement.
Add extra width on both sides for better coverage:
• Standard Coverage: Add 2 inches to each side. The total finished width will be 4 inches greater than the window-opening width.
• Enhanced Blackout Coverage: Add 3 inches to each side. The total finished width will be 6 inches greater than the window-opening width.
Width example:
• If the window opening is 70 inches wide, standard coverage is 70 + 4 = 74 inches.
• If the window opening is 70 inches wide, enhanced coverage is 70 + 6 = 76 inches.
2. Measure the Height
Measure the window-opening height on the left, in the center, and on the right. Record the largest measurement.
Then add extra height based on your preferred coverage:
• Standard Coverage: Add 3 inches above the window opening and 2 inches below it. The total finished height will be 5 inches greater than the window-opening height.
• Enhanced Blackout Coverage: Add 3-4 inches above the window opening and 2-3 inches below it. The total finished height will be 5-7 inches greater than the window-opening height.
Height example:
• If the window opening is 70 inches high, standard coverage is 70 + 5 = 75 inches.
• If the window opening is 70 inches high, enhanced coverage is 70 + 7 = 77 inches.
If the window has a projecting sill, do not add extra length below the window opening. Add 3 inches above the opening for Standard Coverage, or 3-4 inches above it for Enhanced Blackout Coverage.
3. Submit the Finished Product Size
Enter the final dimensions as Width x Height.
Your Sheer Shade will be made to the exact dimensions you provide.
Final Measurement Checklist
• You selected the correct mount type.
• The window has enough clear depth for an inside mount.
• You measured each window separately.
• The measurements are recorded as Width x Height.
• You measured to the nearest 1/8 inch.
• You checked for handles, cranks, and other obstructions.
• For an outside mount, you included all desired overlap in the final dimensions.
Roman Shades
Accurate measurements are the key to a perfect fit. Follow the instructions below and always record your measurements as Width x Height (W x H).
Before You Start
You will need:
• A steel tape measure
• A pencil
• Paper or a phone to record your measurements
Important reminders:
• Measure every window separately, even if the windows appear to be the same size.
• Measure to the nearest 1/8 inch.
• Check for handles, cranks, locks, or other obstructions that may interfere with the window treatment.
• If an inward-opening window handle blocks the product, an inside mount may not be suitable.
Step 1: Choose Your Mount Type
Inside Mount
An inside mount is installed within the window recess for a clean, built-in appearance.
⚠:Inside-mount depth: For Roman Shades, the window recess must have a minimum clear depth of 2 inches.
Choose an inside mount when:
• The window recess is deep enough.
• The mounting area is flat and unobstructed.
• You prefer a streamlined look within the window frame.
Outside Mount
An outside mount is installed above and around the window opening. It is a good option when the window recess is too shallow or when you want better light coverage and privacy.
⚠:Outside-mount surface: Make sure there is at least 13/16 inch of flat mounting space available.
How to Measure for an Inside Mount
Provide the exact dimensions of the window opening. Do not make any deductions yourself.
1. Measure the Width
Measure the inside width of the window opening in three places: top, middle, and bottom.
Round each measurement down to the nearest 1/8 inch and record the smallest width.
2. Measure the Height
Measure the inside height of the window opening in three places: left, center, and right.
Round each measurement up to the nearest 1/8 inch and record the largest height.
3. Submit Your Measurements
Enter the exact window-opening dimensions as Width x Height.
Sovoen will make the required production deduction. For an inside mount, 3/16 inch will be deducted from the width, while the height will remain unchanged.
Important: Do not reduce the measurements yourself.
How to Measure for an Outside Mount
For an outside mount, the measurements you submit will be the exact finished size of your Roman Shade. Sovoen will not make any deductions or additions.
1. Measure the Width
Measure the window-opening width at the top, middle, and bottom. Record the largest measurement.
Add extra width on both sides for better coverage:
• Standard Coverage: Add 2 inches to each side. The total finished width will be 4 inches greater than the window-opening width.
• Enhanced Blackout Coverage: Add 3 inches to each side. The total finished width will be 6 inches greater than the window-opening width.
Width example:
• If the window opening is 70 inches wide, standard coverage is 70 + 4 = 74 inches.
• If the window opening is 70 inches wide, enhanced coverage is 70 + 6 = 76 inches.
2. Measure the Height
Measure the window-opening height on the left, in the center, and on the right. Record the largest measurement.
Then add extra height based on your preferred coverage:
• Standard Coverage: Add 3 inches above the window opening and 2 inches below it. The total finished height will be 5 inches greater than the window-opening height.
• Enhanced Blackout Coverage: Add 3-4 inches above the window opening and 2-3 inches below it. The total finished height will be 5-7 inches greater than the window-opening height.
Height example:
• If the window opening is 70 inches high, standard coverage is 70 + 5 = 75 inches.
• If the window opening is 70 inches high, enhanced coverage is 70 + 7 = 77 inches.
If the window has a projecting sill, do not add extra length below the window opening. Add 3 inches above the opening for Standard Coverage, or 3-4 inches above it for Enhanced Blackout Coverage.
3. Submit the Finished Product Size
Enter the final dimensions as Width x Height.
Your Roman Shade will be made to the exact dimensions you provide.
Final Measurement Checklist
• You selected the correct mount type.
• The window has enough clear depth for an inside mount.
• You measured each window separately.
• The measurements are recorded as Width x Height.
• You measured to the nearest 1/8 inch.
• You checked for handles, cranks, and other obstructions.
• For an outside mount, you included all desired overlap in the final dimensions.
FAQs
Q1: What tools should I use to measure a window?
A1: Use a steel tape measure and write each result down as you go. A level can help identify an opening that is visibly out of square.
Q2: Should I choose inside or outside mount before measuring?
A2: Yes. Each mount uses different measurement points and has different depth and overlap requirements. Decide only after checking the frame and product guide.
Q3: Where should I measure width and height?
A3: Measure at the locations specified in the product guide, commonly multiple points across the opening. Record every result exactly instead of assuming the frame is square.
Q4: What dimensions should I submit for inside and outside mounts?
A4: For an inside mount, enter the actual window-opening dimensions: the smallest width rounded down to the nearest 1/8 inch and the largest height rounded up to the nearest 1/8 inch. Do not make any deductions yourself. SOVOEN will deduct 3/16 inch from the width and leave the height unchanged. For an outside mount, enter the final finished width and height, including your desired overlap; SOVOEN will make no deductions or additions.
Q5: How do I know whether the frame is deep enough?
A5: Measure usable flat depth and account for handles, cranks, trim, screens, and hardware. Compare that number with the minimum and flush-mount requirements.
Q6: What obstructions should I record?
A6: Note locks, handles, tile, molding, shallow ledges, alarm sensors, furniture, and anything that could interfere with brackets, fabric, slats, or the bottom rail.
Q7: How should I measure doors, bays, or adjacent windows?
A7: Treat complex openings as a coordinated layout. Record each section, corner, handle, and clearance, then request guidance if products could collide or leave uneven gaps.
Q8: How can I catch a measurement mistake before ordering?
A8: Measure again from the beginning, read each number aloud, confirm units and fractions, label width versus height, and compare the order entry with the worksheet.
Discover new arrivals, design inspiration, and exclusive subscriber-only perks.

© 2026 Sovoen. All rights reserved. Intellectual Property Rights Privacy Policy